This is how I edit my Second Life photos with Adobe Photoshop
Image or reality
Personally, I love editing. There are some artists who can’t imagine changing anything about the raw image. However, I love the process of editing and also like to manipulate the photo i’ve taken in Second Life to make it more like in my imagination, make ist also more „real“.
In real photography, many effects come simply from imperfect lenses, but are also just as much stylistic devices for images.
I try to use each processing of an image non-destructive and as traceable as possible, so I can readjust each step individually.
Photoshop works in layers and unlike Lightroom, for example, I can’t change my settings directly through sliders. The program is powerful, but I don’t find it very intuitive, like using Lightroom or Photoscape, or Luminar for example. But later I will show that this kind of editing can be used in Photoshop too. It is also possible to save your editing steps in Photoshop so that you can reuse them later for other images.
1 Curves for the natural deformation
‚The very first step is certainly to create a backup copy of the original image CTRL-J is the shortcut for it.
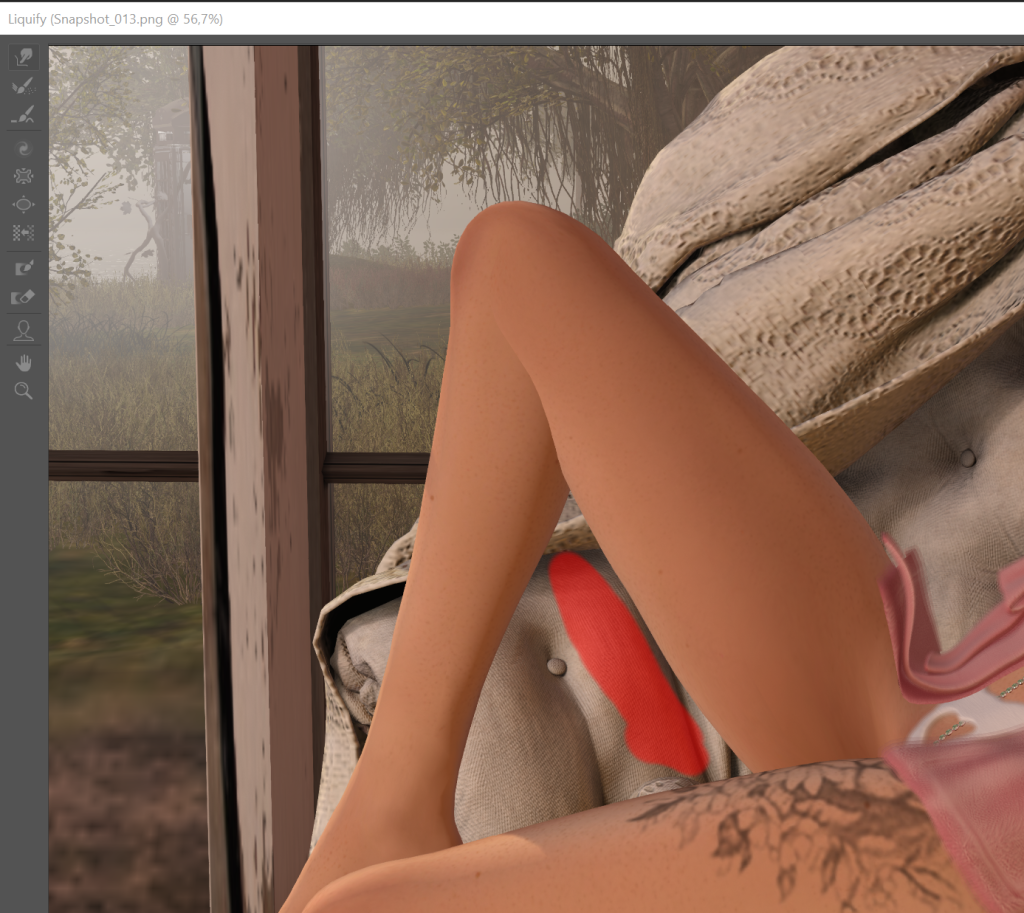
The first step after that for me is to clean up small deformations on the body. Despite Bento, you can see deformations in many poses that a human body would not show.
These need to be smoothed out and the powerful tool Liquify helps us enormously with this. It takes a little practice, but it’s worth it and sits in PS in a very present position in filters.
To avoid unintentionally distorting the background at the same time, the „Freeze Mask“ helps us. With it we can fix everything that is already in the right place. Everything else I prefer to pull into the desired shape with the „Forward Warp Tool“.
2 Curves for more contrast
To give the image a little more depth, I like to create a „curves adjustment layer“ next.
With a slight S-shape our image gains more contrast and therefore also depth.
Because the image automatically gets stronger colors, which I don’t like, I set the layer to „Luminosity“. Alternatively I could set a „Hue / Saturation“ layer after it and reduce the saturation of the image.

You can also set several curves and apply them partially to depths or heights, this gives the image much more depth. With a double click on the layer you get into the layer properties and with „Blend if“ you can define on which areas you want to apply the layer.

3 Cropping the Image
The cut of the image can change the whole character. You bring the object to your eyes and an unusual cut or rotation of the image can change the effect completely.
The Crop tool does a great job here and if you make sure there is no check mark on „Delete Croped Pixels“ the whole thing is also non destructive and can be changed at any time. It shows us by auxiliary lines in which area my object will lie and thus helps us with the 1/3 golden rule.

4 Light Leak and Lens Flair
To dip an image in soft light I use Lightleaks. To understand what this is, just type lightleak in google or bing image search and you will see pretty quickly what I mean. For example, an image might look like this.

You can play with different levels of fill options here, I usually use „Screen“ fill method.
It lightens up areas and the image gets a soft touch. Layer Masks can darken areas that appear too bright and if I set the opacity of the whole layer to about 60%.
All that remains of the layer is a soft glow of light.
5 Color Lookups, a very stylistic element
Under „Color Lookups“ you can find entire color schemes in Photoshop. Here you can try out various color lookups and quickly change the style of the entire image. From day to night, from soft to high contrast. Here you can test without hesitation and simply do what suits the expression of the image. If the effect is too strong, simply reduce the opacity of the layer.

6 More light and more shadow
I like to set accents in my pictures, often called Dodge and Burn.
To do this, I simply create a new layer, set the layer opacity method to „warm light“ or „hard light“ and can now use a brush with white or black color to set shadows and gloss effects. I usually use a soft brush with an opacity of about 12%. With black I paint soft shadows and with white soft light effects into the image.
7 Manual depth of field
To give the image more depth of field, I like to put some blur on the background.
To do this, I copy my image layer with CTRL+J then convert it to a Smart Object with a right click „Convert to Smart Object“.
This has a great advantage because all filters can be changed and adjusted later. If I now apply a blur to the whole layer, let’s say Gaussian Blur with radius of 4 the whole image will be blurred and soft.
To make parts of the body sharp, all I have to do is to paint into the Smart Filter mask with a black brush, and wherever I mask out the blur, the areas appear sharp and draw attention to them.

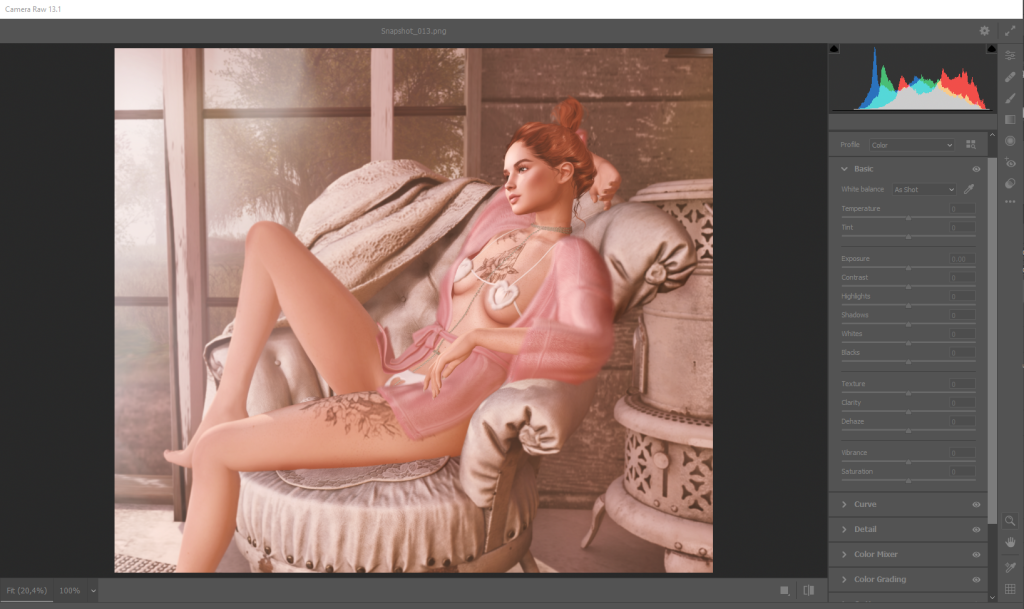
8 Final adjustments in Camera Raw Filter
With Shift+CTRL+ALT+E I create a new layer above all others. It’s practically one layer with all the other layers in one. This allows to add new adjustments on top of all the previous ones. I don’t want to change much, just a little fine tuning.
I convert this layer to a Smart Object, like we did in step 7. Now I use the „Camera Raw Filter“ This filter I unfortunately discovered very late and realized how powerful it actually is. It is as easy to use as Lightroom and it covers almost all of its functions.
Now I finally have sliders for the highlights, the shadows, the colors, I can make final changes to the color grading and since our layer is a Smart Object layer, I can adjust all changes later.
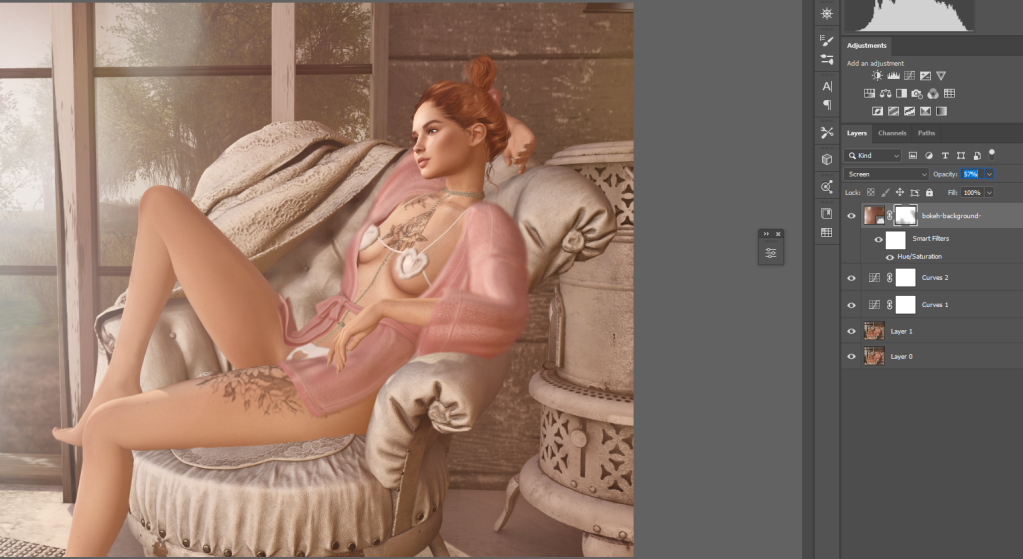
9 Let’s put this together
In my image there are now 7 layers or more that adjust colors, change contrast, add lightleaks and all these adjustments I might want to use again later, because they might be exciting for other images too.
Here’s how to do that:
Above all the layers I’m editing, I create a folder for a new group. Into this folder I move all those layers that I want to reapply later.
And now i use my automatically linked Creative Cloud and move the whole folder with the adjustments into my creative Cloud.

I can also store color schemes, images, templates or logos in my Creative Cloud to access them at any time. You can drag and drop Editing folders while holding the ALT key into layers of your new image and it unfolds all the layers we created. This is amazing, because now you can create different templates for different styles of editing.
I love to use these to get a first impression of how it will look like
Epilogues
Who has followed me up to here, many thanks for it and I hope it is helpful for one or the other.
I would be very happy to get a small feedback.
We are also very interested in exchanging our knowledge a little.
For this reason we have created a Flickr group where all artists are welcome.
Christina edits her pictures mostly masterly with the photo tool PhotoScape X which is freely available and comes with a very creative way of editing.
Christina will surely publish soon a small tutorial how she works.
See you, stay healthy and keep creative
Links
Link to our Flickr Group
Link to Adobe Photoshop
Link to PhotoScape X
Link to Christina’s flickr profile
Link to Wiwi’s flickr profile
